Showing posts with label tutorial. Show all posts

Sep 29, 2009

Paper Wreath Tutorial!


Hey everyone! A sweet lady showed me this simple way to fold a punched circle at CHA... she showed me how I could make a flower from the folded circles. I have since had this idea pop into my head. I went out the other day and got everything I needed for this project. The beauty of this project is that it's not really that difficult and it can be changed based on the holiday or season. You could make a valentine wreath, easter wreath, halloween wreath, fall, etc. by simply changing the color/pattern of the paper you choose and changing the embellishments you use... maybe some easter eggs for easter or some stars for the fourth of july!

First, the finished product:


OK.
here's what you need:
1. Patterned Papers (you need at least 2 sheets and possibly more if your wreath is large)
2. Styrofoam wreath (I used a small one - aprox 8.5 inches across). I also chose a white wreath but you could probably save time by getting one of the green colored ones.
3. Paint- if you need to paint your syrofoam
4. Hole punch (mine is 1 3/8")
5. Mounting double sided tape (or your favorite craft glue)
6. Brads, sequins or embellishments of choice
7. Straight pins
8. ribbon

I used Piggy Tales patterned papers, Creative Imaginations brads and flowers. Making Memories leaf straight pins, WRMK glittered brads.

Instructions:
I painted my white syrofoam green with pebbles inc acrylic paint and allowed it to dry completely.
Cut many, many circles from patterned paper using your hole punch. Then, fold them all...


If you want to hang your wreath with a ribbon then start by tying and securing your ribbon around your wreath.
Cut your mounting tape into thin strips (I found that the scotch mounting strips I was using were too thick). Place the folded circles inside one another and mount onto foam wreath. Cover the entire wreath with folded circles as seen.

Next, embellish away. I found that I needed to add a bit of adhesive to the base of some of my brads to make sure they stayed in place. Then I used straight pins to pin my "poinsettia" flowers in place up at the top. Hang and enjoy!

As far as storage goes- My wreath is small enough that I carefully placed it in a gallon ziploc storage bag. Just make sure the wreath isn't placed under something that could squish the leaves.

Be sure to show me your creation if you choose to make one of these!

Jul 7, 2009

Birthday Countdown (7more days), Sneak Peek #4. a look at my scrappy area and a quick rubon tutorial!


This is so much fun celebrating two years of Label Tulip! Be sure to read the challenges going on and check out our facebook group for many chances at some fabulous goodies! Ready for more birthday fun?!


First, let me tease you with a peek at the main kit for July Oh, the places you'll go. This is the fourth sneak peek of our kit this month with the big reveal July 15th!


I'm really enjoying reading the responses of the other tulip girls to these getting-to-know- you questions... here are mine...

1. If I could be in any infomercial, I would pick (product name), because:
Probably something scrapbook related because it's something I really know and love... other than that maybe some miraculous skin cream.. I'd love to be the recipient of a transforming skin product and be the after photo! ha!

2. If I could be any character from a movie, I would be ______ from ______, because:
Anne from Anne of Green Gables. She seems so genuine, able to speak her mind and lived in such innocent, simpler times.

3. If my life story was to be written as a novel, the title would be:
An everyday kind of girl!

4. I always wanted to be a:
singer

5. If I can only give my children one piece of advice, it would be:
Love Jesus with all your heart and love others as yourself

6. Three things I want very badly at the moment are:
new carpet, a nice cruise with my hubby, more time.

7. What is your process for creating layouts as you receive Label Tulip kit? Do you start with photos, paper, a sketch, or something else?
Sometimes as I'm unpacking the kit certain ideas will just pop into my head before a photo is even decided on. Other times I have a picture that I start with and work around.

8. I had the BEST time creating this layout using Label Tulip kit:


9. Show us your sneaks for Label Tulip's July kit!


(see above)

Next, here's a look at my creative space....
voila, my.... dining room. yep. We have an open floor plan in our little home and our dining room table is where I scrapbook. The fact that we eat dinner at that table nightly is a great motivation to keep my scrapping area fairly clean.Right beside the table is my craft armoire which holds much of my supplies.


I also have a few rolling plastic storage shelving unit thingies (hee) in our bedroom for overflow items. Many of my storage containers are from the Target dollar section!

Super easy, but fun wee tutorial here... using rubons. I so love rubons. I just place this floral rubon onto brown cardstock then cut out the design for an added bit of flourish for my design. The bird was created by rubbing the bird onto blue cardstock. The light color just didn't seem to show well on the light blue so I took a brown journaling pen and went around the designs on the bird. Once I cut out the bird from the cardstock I attached it to my project with pop dots.


Thanks for letting me share and hope you jump right in to all the fun challenges and things going on leading up to our 2 yr birthday! Don't forget there are some great stamps for sale during the next few days in the boutique! OH... the more you participate the more likely you will win a Label Tulip 3 months subscription!!

Birthday Countdown (8 More Days!), Sneak Peek #3 and Label Tutorial Part One

Hey there and happy Tuesday!

In honor of Label Tulip's birthday celebration I thought it would be fun to do a little something using a scrapbooking staple of mine, labels! (Also hello, we are called LABEL Tulip. It was too good to pass up.)

Personally, I love labels. There are so many things that you can do with them. You can use them as labels for things (of course) but also as page accents, as frames, as decorative elements... the list goes on. My favorite thing to use them for is journaling.

These days a lot of people are looking for ways to really stretch their scrapbooking dollars, and a good way to do that is to make your own embellishments.

Today's label-theme will be presented to you in two separate posts. In the following post there will be a digital freebie for you (designed by me exclusively for Label Tulip) and a challenge with a prize!!!

In this tutorial, we are going to be making our own labels out of canvas--for certain reasons which have a little something to do with this TOURIST related item: Ahem. I do love me some sneak peeks. ;) Moving on... Let's get the party started and get painty!
To begin, you are going to need the following items:
- Canvas (or a cotton fabric might work)
- Gesso (or white paint or elmer's glue + water)
- Colored paint or a heavily pigmented ink pad
- Label stamps
- Scissors

Optional goodies
- Good journaling pen or sharpie
- Thread or sewing machine
- Eyelet and eyelet setter
- Ribbon
- Other decorative stamps, paint or watercolor

First you need to make sure your canvas (or fabric) is suitably primed and ready to work with.
I usually buy my canvas fabric from my local art supply store. The texture is a little rough, so I ususally do one or two coats of gesso to prime the surface. This coat ensures that my work surface will be very even and it will also stiffen the fabric which will make it easier to work with later on. Here I cut out a swatch that an easy size to work with (about six inches by eight inches).

If you don't have easy access to buy bulk canvas fabric, the new Claudine Hellmuth canvas sheets are a great alternative, as they have a very fine texture and already start out with a bit of a primed surface. If you are using those, you should just be able to do a light wash of gesso (or paint or glue+water mix) to seal and smooth the surface of your canvas.

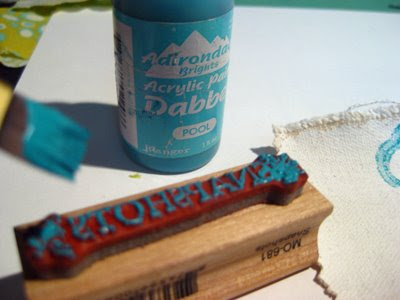
While you let everything dry completely, you should determine whate type of label you are going to make. You can obtain some very fine label stamps in the boutique here at Label Tulip, as well as other places. One of my very favorite sets is by 7 Gypsies. Catslife Press also makes several label stamps that I adore. Once you have chosen a stamp, you'll need to "ink it" with your paint. I prefer paint daubers for this, although you can also use a paintbrush to apply the paint onto the label stamp. Regardless of the tool you use, the best way to get the paint on the label is to gently "tap" it onto the stamp.
Once your stamp has a good coat of paint or ink, go ahead and stamp onto your canvas. Be sure to apply even pressure across the stamp to ensure good coverage of the image.
Depending on how your stamp likes the paint and how you applied it, your first label may not look very pretty. This is okay, and can be fixed later (promise). Hopefully though, it looks something like this:

Keep stamping till you have as many labels of this kind as you would like.
You could even stamp journaling using an alphabet stamp or make text strips (think like your own canvas wordfetti):
Once dry, go ahead and cut everything out. Made a mistake? Cut it out or repaint it the edges once you've trimmed out the bad stuff. You should end up with some of these:
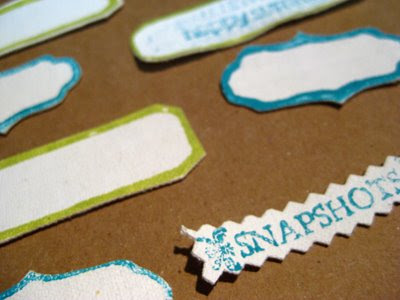
You can adhere them to your projects by glueing them down or with good old-fashioned sewing.

It's also a quick step to go from label to tag. Grab one of your labels, and your eyelet setter.

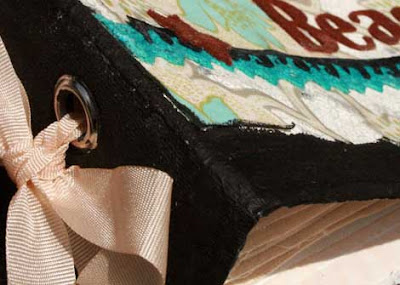
Punch a hole, set an eylet, add a little ribbon and voila! Custom and cheap labels and tags. Hope you enjoyed this little tutorial. Stay tuned for part two!

Birthday Countdown (8 More Days!), Freebie and Label Tutorial Part Two (with challenge!)


And now for part two!

But first, a little fun Q&A about me! As part of our ongoing birthday celebration, each of the Tulip Girls is going to answer a fun little questionaire so you can get to know us better. :)

1. If I could be in any infomercial, I would pick Lomography Cameras because: I think that what they do for photography as an art form and as a hobby is pretty revolutionary and cool.

2. If I could be any character from a movie, I would be Kate from French Kiss because: she lost everything and then found happiness unexpectedly. Also, she gets to live in a little stone cottage in the South of France. Does it get better than that?

3. If my life story was to be written as a novel, the title would be: Camera in Purse, Coffee in Hand; the story of an adventure.

4. I always wanted to be: a journalist.

5. If I can only give my children one piece of advice, it would be: Find your passion, or at least a hobby that you care about, and make sure you give yourself time for it frequently.

6. Three things I want very badly at the moment are: Sleep. Infinite riches. Weekend.

7. What is your process for creating layouts when you receive your Label Tulip kit? Do you start with photos, paper, a sketch, or something else? I usually have a sketch or two in mind, then I look at the photos I have and think of what would coordinate best with the products. And then I figure out what story I want to tell.

8. I had the BEST time creating this layout using a Label Tulip kit:

One of my favorites! It just really came together easily and I love the composition.


And now, on with the Label stuff! It's time to get hybrid!

Here is a link to a PDF file of digital images I have designed with a Summer theme in mind.

I used some of the images to make a very fun layout about my summer time thoughts. (Credits for the typefaces used belong to Misprinted Type.)

Don't be intimidated by the hybrid-ness. Just go for it. Print out some of these images and start playing. If you get stuck or have issues, please PM me on the Label Tulip boards and I will be happy to lend any assistance necessary. :)

I made a layout to start with, using elements from the download as well as some of the canvas labels created in the first tutorial.
Here are some of the details:

So are you ready for a challenge?

I challenge you to make some sort of artful project using the digital freebie I've created. Pages, cards, ATCs, altered stuff, whatever it is that you make, I wanna see it!

Please be sure to link your work either to the comments on this post or on the "Day 7- Label Projects" thread in the "Challenges" board. Don't forget that you can upload these projects to our Label Tulip Member’s Gallery as well.

You have until July 14 (6 p.m. PST) to submit as many projects as you’d like. We will feature the winning project in our newsletter and blog on July 15, 2009, and award the winner with this delightful prize package:
You know you want this! Look at the Thickers, and the stickers and all the rest of those goodies. Excellent.

Well my lovelies, that's all for now. Cannot wait to see what you come up with!

HAVE A GREAT DAY!!!!